In this article I provide an easy recipe for sourdough pizza starter as well as explaining exactly what it is and how it works. It may seem like magic (and it kind of is!) but it’s actually really straightforward.

Once you’ve made your sourdough starter you’ll be ready to make incredible sourdough pizza. Keep reading for more information and don’t miss the recipe at the bottom of the page.
You should have a wonderful sourdough starter for your pizza in no time!
Keep reading to find out everything you need to know about sourdough starter for pizza. If you know what you’re doing already, you can click here to skip to the recipe.
A sourdough starter is needed to make sourdough pizza. It is basically just flour and water mixed together, and kept in such a way that natural (wild) yeast is encouraged to grow in it.

A sourdough starter for pizza (or any dough) is basically just a mix (usually 50/50) of flour and water – a wet dough. This dough is “topped up” with more flour and water regularly, to encourage yeast growth. This starter dough is then added to your other ingredients in order to make pizza dough.
Topping up your starter is known as “feeding”. This is because you are feeding the yeast culture living inside your starter each time you top it up.
There are trace amounts of yeast present in flour. By providing the yeast with additional flour, you are allowing it to feed on plenty of fresh nutrients, encouraging growth.
And by adding an equal amount of water, you are providing a moist environment for the yeast, allowing it to flourish.
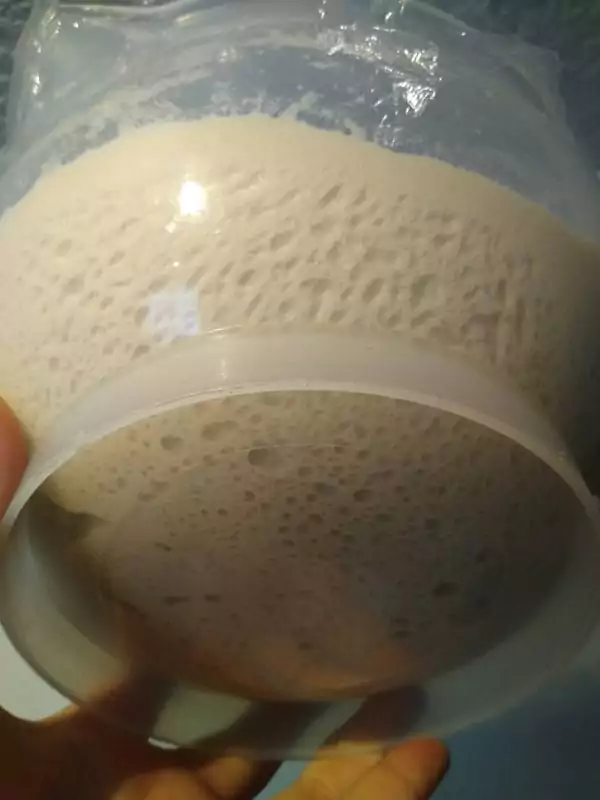
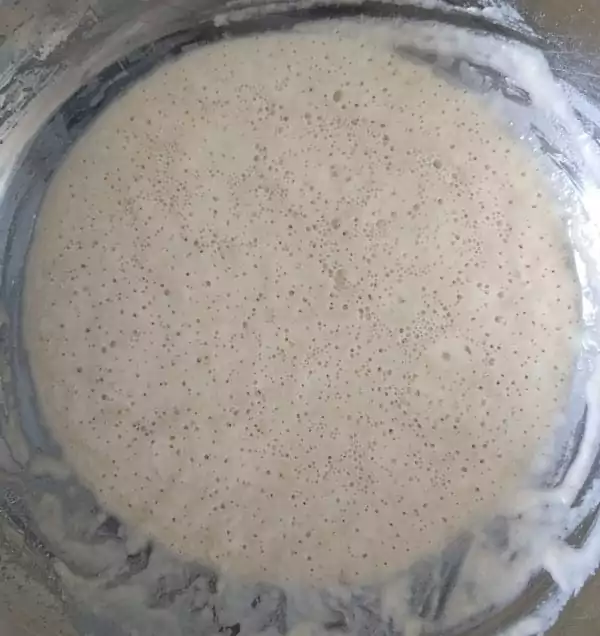
Over time, the yeast grows into a healthy culture. At this stage, the starter is ready to bake with. It is easy to tell once the starter is ready because it will be very bubbly – “active” is the technical term!
A sourdough starter can be kept indefinitely when fed regularly. In fact, some bakers have a starter which is hundreds of years old! It can be passed down through the generations, and used as many times as you like.
Actually, the older a starter is the better it is, in general. Older starters tend to be more active (produce a better fermentation), more resiliant, and produce more flavour. Keep hold of your starter as long as possible and don’t be afraid to feed it with different flours from time to time. This may help to improve the depth of flavour your starter offers.
Whilst a sourdough starter doesn’t require any yeast to be added, it still has yeast in it. Yeast is a key ingredient to great pizza, and don’t let anyone tell you otherwise!
Yeast makes pizza dough light and airy, and easy to eat, as well as producing a wonderful flavour. Without yeast, pizza would be dense and chewy, difficult to eat, and nowhere near as tasty!

The beauty of sourdough is that the starter contains natural yeast (wild yeast), so we don’t need to add any to it. A sourdough starter also helps to produce more flavour in the dough when compared to commercial yeast, thanks to the natural bacteria inside it. Think of it a bit like yogurt that naturally contains good (and tasty) bacteria. The bacteria helps to give it the sour taste.
A sourdough starter should be fed regularly to keep it active and ready to prove pizza. To feed it we basically just stir in some more flour and water.
At room temperature a starter should be fed every day ideally. But when stored in the fridge, feeding every 1-2 weeks is fine.

When we’re ready to make pizza, we remove it from the fridge and feed it for 2-3 days, building it up to the amount we need. This is known as building a levain (pronounced “le van”) – which is French for “rise” (ie “prove/ferment”).
The best ratio of flour to water for a sourdough starter is generally accepted to be 1:1, or in other words, equal parts flour and water. This ratio is known as the “hydration”, since it tells us how much water is in the starter.
There are 2 reasons for the 1:1 hydration ratio. These are as follows:
Let’s go over these in more detail.
Firstly, the high moisture content (high hydration) provides excellent conditions for yeast growth. This makes it easy to achieve a very “active” starter, which is capable of producing a light and airy pizza crust, thanks to an excellent fermentation (prove).
Secondly, having a starter with equal amounts of flour and water makes recipes easy. This is because calculating how much flour and water is in the starter is very straight forward.
For example, let’s say we have a 200g starter. Because we have a 1:1 ratio, we know there is 100g water and 100g flour in our starter, without having to do any complex calculations.
The easiest way to achieve this 1:1 ratio is to simply weigh out the flour and water. I like to use digital scales (and grams), as these are the easiest and most accurate.
The ratio of water to flour (the hydration) in a starter is often expressed as a percentage. The weight of water is compared to weight of the flour, in what is known as baker’s percentage.
As a percentage, the 1:1 ratio is 100%. This is because there is as much water as there is flour, or in other words, there is 100% as much water as flour.
For more information on this, check out my article on baker’s percentage here.
As well as the hydration of the starter (100% or 1:1 water to flour), you also need a ratio for how much to feed your starter – or the “feeding ratio”.
Many people choose to use a ratio of 1:1:1 when feeding. The first 1 represents our starter, the second 1 represents the flour to be added, and the third 1 represents the water to be added. For example, let’s say we have 50g of starter, a 1:1:1 feeding ration would mean we would feed the starter 50g of flour and 50g of water, for a total starter size of 150g.
However, I prefer to feed the starter in a 1:2:2 ration as it tends to result in a more “active” starter (or levain). This is particularly useful when feeding a starter that has been in the fridge. It will “wake up” quicker and will tend to produce a better fermentation.
With the 1:2:2 ratio, we are effectively feeding the starter twice as much, since we should feed our starter twice its weight in flour and twice its weight in water. The flour is the main “food”, with the water being there to ensure the same hydration. For example, with the same 50g starter, we would feed it 100g of flour and 100g of water, for a total starter size of 250g.
Notice that in both cases, we still feed the starter with equal parts flour and water. This ensures our hydration is always 100% (as mentioned previously) and should never change (except for advanced use cases).
Also notice that with the 1:2:2 feeding ratio, we end up with more starter after feeding (when compared to the 1:1:1 ratio). This allows us to keep less starter in the fridge (taking up less space) and still end up with a nice amount after feeding. This is a nice added benefit to this feeding ratio, but the main reason I recommend it is for the more “active” fermentation that it encourages.
It is also generally good practice to keep feeding your sourdough starter in the same ratio (eg 1:2:2). This should keep your sourdough consistent in terms of it’s flavour and fermentation. But of course you can feel free to experiment if you like. There are many ways to make great starter!
Your starter is ready to use when it is nice and bubbly, and it has roughly doubled in size. This is known as the “peak” of your starter and normally takes around 8-12 hours to reach (following feeding), depending on how “active” your starter is.
In general, the more your starter has been fed, and the older it is, the more “active” it will be. Some active starters can be ready in as little as 6 hours, especially if it is warm.
A good way to tell if your starter has reached its “peak” is to put a rubber band around the jar to indicate your starters level just after feeding. You should then be able to tell easily when your starter has risen to twice its initial size.

The “peak” is the moment just before the starter starts contracting (falling back down the jar). Take note of roughly how long your starter takes to reach its peak and then you will know for next time. Bear in mind that temperature can have a significant impact on this time. The warmer it is, the faster your starter will ferment.
The feeding ratio and hydration of the starter can also effect this time, so it’s important to keep these consistent. As mentioned previously, I recommend a 1:2:2 feeding ration and 100% hydration, or 1:1 hydration.
There is a common myth that sourdough starter needs to be open to the air – ie not have a lid on it. The reasoning is usually that the starter takes yeast from the air, but this is not the case.
Flour naturally has trace amounts of yeast in it. When given a moist environment (by adding water), this yeast can grow. The yeast feeds off the carbohydrates in the flour. When topped up regularly, or fed with fresh flour, this yeast can grow into a healthy colony of wild yeast and good bacteria.
This is why developing a starter takes some time – around 1-2 weeks. Initially there is only a tiny amount of yeast in the flour – not enough to prove pizza. By providing it with more carbohydrates in the form of fresh flour, we can encourage it’s growth. The addition of water alongside the flour ensures that we always keep a nice moist environment for the yeast.
So, a sourdough starter doesn’t need to be exposed to the air. In fact, I recommend that you keep a lid on your starter. This will prevent flies or any other foreign material from accessing your beautiful yeast culture. It will also ensure that your starter doesn’t dry out and should extend it’s life should you forget to feed it.
The recipe below is possibly the best recipe for sourdough pizza starter that you will find. I have developed the recipe from lots of trial and error! What’s more, I go into detail on every step along the way.
Making sourdough starter for pizza is much easier than most people think. And now you have an idea how it works, let’s get into how to make it!
It is worth mentioning that in this recipe, I recommend keeping a very small amount of sourdough starter. The reason for this is that as we top the starter up (feed it), it is easy to end up with too much starter which ends up getting waisted. Of course, you can give any leftovers to friends and family, but there’s only so much you can gift until they get sick of it!

Also, we can easily add to our small starter and build it up before making our pizza dough. This will be covered in more detail in the next article on making sourdough pizza. In this, I’m focussing on making the starter itself.
With that being said, let’s get into the sourdough pizza starter recipe.
Sourdough Starter For Pizza
Follow this recipe and feeding schedule for 1-2 weeks for the perfect pizza sourdough starter.
The quantities listed below are enough for feeding your starter every day for 2 weeks. This should be plenty to establish a healthy sourdough starter.
Not all the following utensils are required but these are what I use and they tend to make the process much easier.
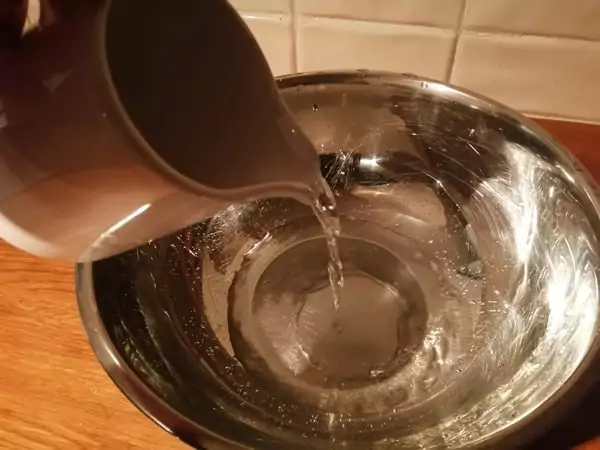
Any large bowl could be used for mixing the dough but I like using the metal ones since they’re lightweight, stackable, and easy to clean.
Click here to check out metal mixing bowls like the ones I have on Amazon.

These are affordable, easy to use, and precise (accurate to 1g). I don't recommend using cups as measurements as they are inprecise.
Click here to take a look at the type of digital scales I use on Amazon.

These kitchen scales are accurate to 0.01g and are perfect for measuring the tiny amounts of yeast needed for long proves.

Pizza proofing boxes are an excellent investment. They are airtight and they make taking the dough out for shaping very easy.

An infrared thermometer allows you to instantly check the temperature of the stone, ensuring it is within the ideal range.
Click here to check out a pizza peel similar to the one I use on Amazon.

A 12 inch peel is ideal for Neapolitan pizza and makes loading and removing your pizza from the oven really easy.
Click here to check out a pizza peel similar to the one I use on Amazon.

A turning peel is designed for rotating the pizza during cooking. If you're using a pizza oven it should lead to a superior and more even cook.
Click here to check out a pizza peel similar to the one I use on Amazon.

A pizza oven is guarenteed to take your pizzas to the next level. I have an Ooni Karu 16 which reaches 500C/930F and cooks pizza in as little as 60 seconds! A regular oven simply cannot match the cook of a pizza oven. I love my Ooni!

Here’s the method for making a healthy sourdough starter which can then be used to make incredible sourdough pizza.
This starter can be kept indefinitely, as long as it is fed (topped up) from time to time. Storing it in the fridge means it will only need to be topped up every 1-2 weeks, as opposed to every 1-2 days at room temperature.
Some sourdough starters have even been known to survive months without feeding in the fridge! But they will need to revived with regular feeding for a few days before using for sourdough pizza.
Mix it with a knife or the wrong end of a spoon
Levain is the French word for a sourdough starter that is intended to be used for making a dough. It literally translates as “rise”. You may be asking: “isn’t all starter intended to be used for making dough?”, but the answer is not necessarily.
In my experience, it is better to build your small amount of starter into a larger “levain” each time you want to make sourdough pizza. This method ensures that you have a very healthy and active starter each time you make pizza. It also means that we don’t have to worry about feeding our starter everyday – we just have to feed it well in the 2-3 days before making pizza. It also means that we don’t end up with lots of waste.
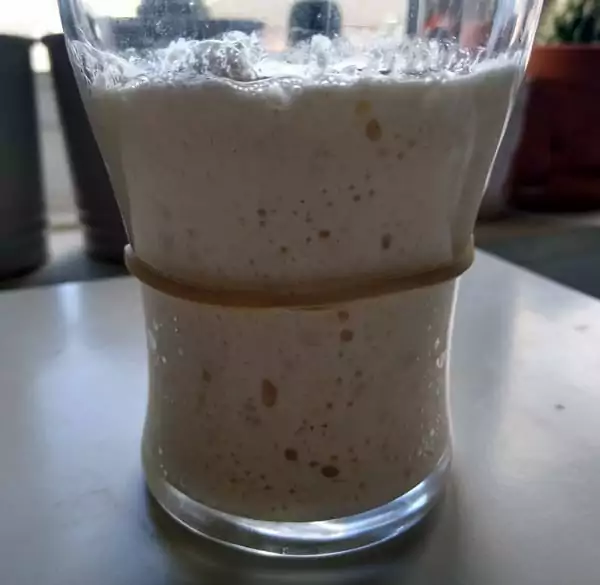
Your levain should look something like this – the band shows how much it’s grown
00 flour works just fine in a starter
Keep reading for more detailed information on sourdough starters for pizza.
Hopefully this article and recipe has giving you an excellent starting point for sourdough pizza (pun intended)! If you think I’ve missed anything out or you have any questions, feel free to leave a comment below. I try my best to answer them as quickly as I can.

Congratulations on taking your first step towards amazing sourdough pizza with this sourdough pizza starter recipe. Also, bear in mind that you can use your starter for other doughs too, such as loaves of bread.
Now, time to get started on that sourdough! Over and out.

I’m Tom Rothwell and I’m super passionate about all kinds of homemade pizza! In the last few years I've been on a quest to find the perfect pizza. Now I'm sharing what I've found out with the world!
If you're interested in hiring me for your event in the UK, feel free to check out my website with the link below.
Pizza Catering


I often get asked what type of oven I use for my pizzas. Well, I use a pizza oven made by a company called Ooni.
The range of pizza ovens that Ooni offers is just brilliant. They cover all bases, and all price points. There's affordable and portable models such as the Fyra 12 Pizza Oven and then there's state-of-the-art models such as the Karu 16 Pizza Oven pictured below.
In all honesty, I would say that the oven makes a huge difference. If you're looking to make authentic Italian pizza, a pizza oven is a must.
By clicking the link below and purchasing from Ooni, you would be supporting this website. I've been using their ovens for a long time now and I wouldn't recommend them if I didn't believe in their products.
Time to make some amazing pizza!
I’m Tom Rothwell and I’m super passionate about all kinds of homemade pizza! In the last few years I've been on a quest to find the perfect pizza. Now I'm sharing what I've found out with the world!
If you're interested in hiring me for your event in the UK, feel free to check out my website with the link below.
Pizza Catering


Hi Tom, couple of questions if you could clarify please. Looks like you end up with around 500g of starter, so using a jar of that capacity or a little more is ideal I assume? Is the removing 40g in step 3 a one-off, or do you remove some each day you feed it? Appreciate any response you can provide
Hi Rodney, thanks for the questions. I only ever keep 50g of starter and then I build it up (make a levain) when I mant to make pizza.
To do this, I remove 40g each time I feed it. Although this may seem wasteful, it prevents us from having a huge starter which leads to more waste.
Also, be sure to check out my sourdough pizza recipe which is out now!
Hope this helps.
So, when feeding the starter in the first 2 weeks, after the first feeding, do I take it down to 10 grams every day and then add 20/20 of water and flour?
That’s right David, you’ve got it!
I also recommend this feeding schedule once your sourdough is established. But at that point, you should only need to feed it every couple of weeks, if you’re keeping it in the fridge.
Good luck with your sourdough!
Hi there, so intrigued with your starter info. I’m having issues getting my starter going.
I’m following your recipe to the T, using 00 flour. I get some bubbles but this is my second attempt and it is not doubling after 2 weeks. Room temperature is about 73 -74 degrees F.
What am I doing wrong? Any advice is appreciated.
Shannon
Hi Shannon, you probably aren’t missing anything, I would keep going. Just stick with the same starter and keep feeding every day, it will get there eventually.
Even if it isn’t doubling though, if it’s bubbling a lot then it still might work well. If it doesn’t, you may want to consider trying some different flour. You could always mix some different flour into your starter and see if that helps.
Starters are very risiliant things so don’t give up on it. Some can just take longer than others.
Thanks for the question and keep going!
Tom
Hi Tom
Great read for building knowledge.
Do you use 00 flour for all the feeds?
I have seen other articles that say to use plain flour.
Cheers
Sam
Thanks Sam, I’m pleased you’ve found it useful. You can use whichever type of flour you like really, I just recommended using 00 flour to start with since everyone will probably have that anyway.
A good idea is to experiment with adding different flours to your starter, this should help to produce more complex flavour.
You could add some wholewheat or rye flour if you like. I’d probably go for around 20% of the weight of flour in your starter as wholewheat/rye if you want to try it.
Have fun with it! Cheers
Great Article – Always wanted to try a sourdough pizza crust in our pop-up. It just makes me nervous to be able to manage a starter which would accommodate say a 100 – 250G Ball recipe. Would you be able to simplify this for me? It’s so easy to do a normal starter because I don’t need to feed it. Greatly appreciate your post…!
Hi John, I’d be happy to help but I’m not sure what the question is. Would you be able to send me a message via my contact form here please? I’ll try to help however I can. Cheers
Hi Tom, I have just started the starter dough today, tomorrow I remove 40g. Do I remove 40g every time I feed the starter?
Hi Lesa, that’s right, you remove 40g each time you feed it. This will leave you with 10g of starter which you feed with 20g water and 20g flour. Therefore, your starter always remains at 50g.
This method helps to keep your starter as fresh and active as possible, whilst minimising waste. Once you have an active starter you can leave it in the fridge and only feed it before you intend to use it.
I hope this makes sense? Thanks for the question.
Thank you for the detailed explanation. What is the maximum time period a starter can stay in the fridge without a feed before it goes bad?
Hi Jean, thanks for the question. A starter can last for months in the fridge without feeding though it’s not ideal. I’d recommend trying to feed your starter at least once a month.
But in truth, if it’s not mouldy, it should be fine. I would take an old starter out of the fridge and give it a good stir. Then leave it out of the fridge, feeding it every 12-24 hours for a few days. This should bring it back to life.
Hope this helps!
Hi Tom, I’m about 5 days into your process of making a starter. I’m using 00 and following your advice of removing 40g each time too.
The first three days I was excited to see bubbling which seemed sooner than I’d expected. But this seems to have almost stopped. I missed last night’s feed as I’d read elsewhere that a starter can slow down and it can help to give it a day or two before feeding it again.
So I’ve given it a day and now unsure if to give it another or start feeding again and persist? It does have a really classic sourdough smell, just no visual signs of activity.
I had also wondered if maybe giving it a feed or two with strong white flour might add to the culture?
Hi Jonathan, I think you should keep feeding the starter every day. Personally, I don’t see how “giving it a rest” would help the starter. In my view, this is simply starving the starter of the food it needs.
My advice is to keep going with the feeding as normal every day. You should have a healthy, established starter within 2 or 3 weeks at most.
Also, I wouldn’t think that feeding with different flour would help the starter in any way. The main reason for using different flours is to develop more flavour in the starter. But if you’re wanting to experiment with this, I would recommend adding some wholewheat flour and/or rye flour.
Keep going, it will get there! Thanks
Hello Tom, thanks for all the knowledge and time explaining the how and why of Poolish Pizza. My next pizza will be with your Poolish recipe.
I’ve been using a starter for many years and my starters are not sour. Do you have experience with poolish rye bread? Would you use about 50% total flour for the poolish?
Thank you for your many many hours experimenting. The best to you, Mike
Hi Mike, I hope the poolish turned out OK.
Personally, I haven’t experimented with Poolish rye bread but I don’t think it should be much different to using a starter really. If you figure out how much yeast it takes to prove your poolish at the same rate as your sourdough (usually about 0.2% depending on temperature etc) then you could use your exact sourdough recipe for poolish.
I quite like using 50% total flour as it produces a roughly 24 hours total prove (12 hours poolish + 12 hours main dough). However, you could use less if you wanted a longer prove.
Thanks for the question and good luck Mike!
Questions for the starter recipe after the initial 40g is thrown out and 20g flour and 20 water is added. How much would you put in each day, and do you still throw some out each day?
Hi Dean, yes the same process is repeated every day until you have an active starter. At that point you can refrigerate it and just repeat the feeding process every couple of weeks or so.
Hope this answers you question. Thanks
OK I read through this a few times and I’m a bit confused… It only seems to be the recipe for making sourdough starter for the pizza. Did I miss something?
Hi Jack, you have been reading the sourdough starter recipe – which explains how to make the starter.
Click here to check out my recipe for sourdough pizza.
Good luck!