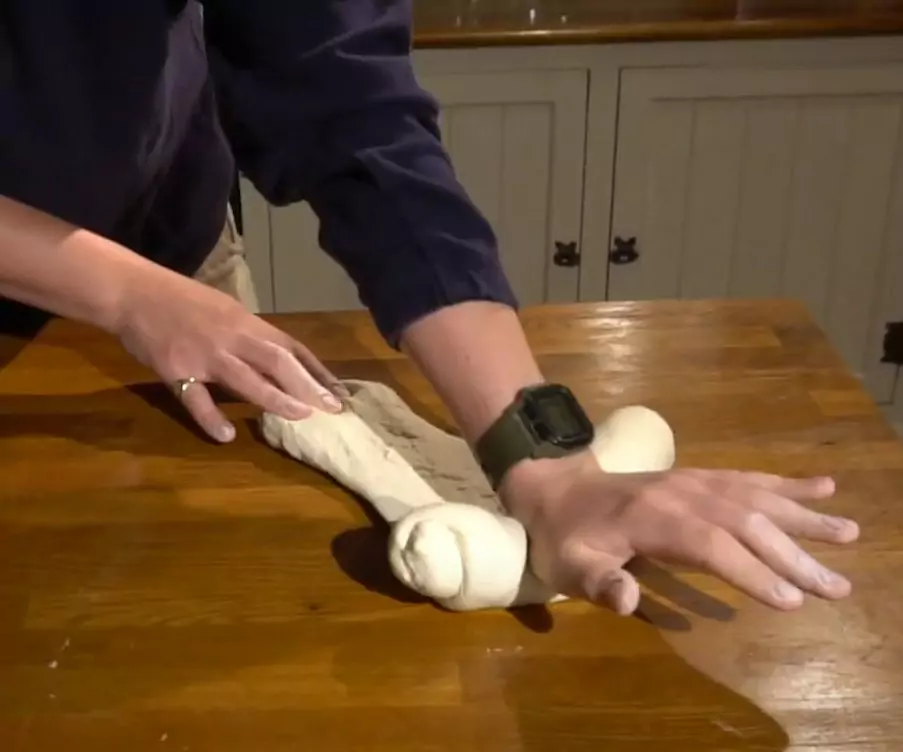
Balling pizza dough is a crucial step in the pizza making process. The good news is that it’s really easy. Take a look at the video below and check out the recipe too.

Balling pizza dough is a crucial step in the pizza making process but it is really easy. Like with kneading, there are so many different ways to make dough balls.

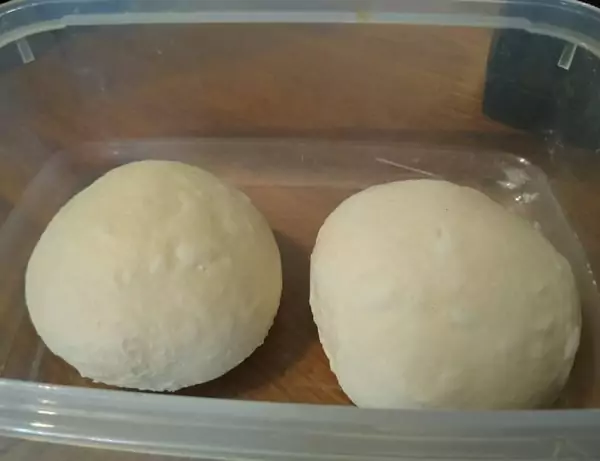
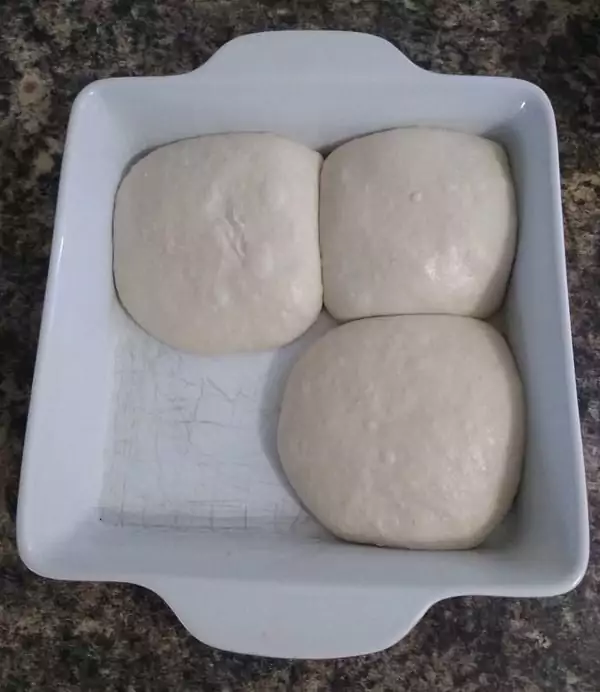
Once we have made our pizza dough balls, we can allow them to prove for a final time. Once our dough balls have proved, we are ready to shape and cook some amazing pizza!
If you missed the rest of the series, be sure to check them out with the links below:
In this 4th part of the series, I show you a couple of different easy techniques for shaping pizza dough balls. I also discuss the best types of containers for proving your dough balls. Check out the video below:
We have already covered the recipe in this series. This article is more about balling techniques so read on for more info! However, you can click here to skip ahead to the recipe at the bottom of this page if needed.
We have already covered the recipe in this series. This article is more about balling techniques so read on for more info! However, you can click here to skip ahead to the recipe at the bottom of this page if needed.
There are a few reasons why we ball pizza dough:

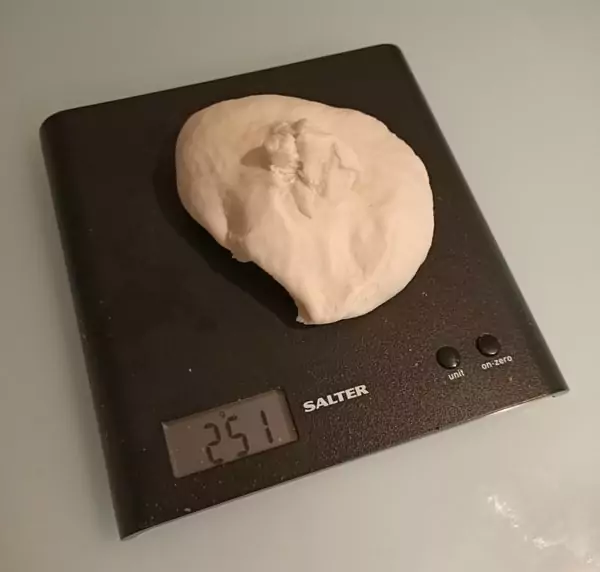
Basically, we are trying to achieve a round dough ball which is quite tight. By weighing the dough out first, we can also ensure that each dough ball is the correct weight for each pizza.
The tension that we build in the dough ball will provide strength as it proves. This will help the dough to hold it’s round shape which will make the shaping much easier later.
There is no need to over tighten the dough, however, as do not want to rip the dough.
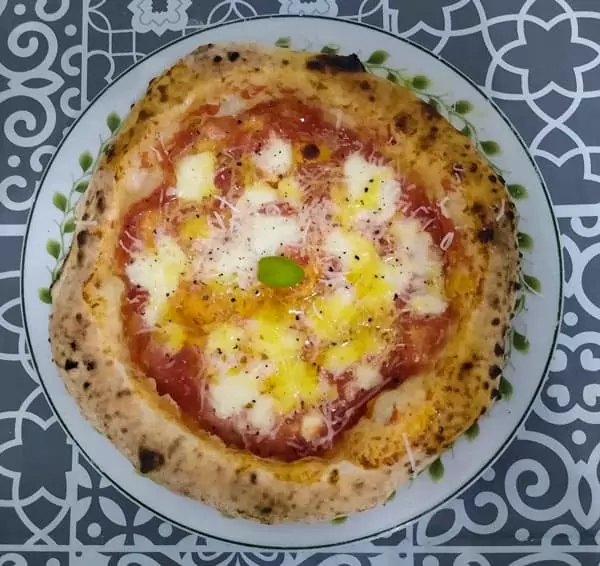
For Neapolitan pizza, the weight of each ball should be between 180g – 250g. Personally, I tend to go for around 250g or just under. With this you should be able to achieve a 10 inch pizza with quite puffy crusts.
The weight that you choose will depend on how you shape the pizza. Even within Neapolitan pizza there are different styles of shaping.
Some people like a pizza with large, soft crusts and some people like a pizza with smaller, less risen crusts. I tend to prefer a pizza with slightly larger crusts, somewhere in the middle.
For a 10 inch pizza with quite a large crust, I find about 240g -250g to be perfect. This will allow you to stretch the pizza really thin in the middle whilst allowing the crusts to be quite big.
If you prefer a smaller crustm try a ball weight of 200g – 210g. This will allow you to stretch the pizza to around 10 inches with quite a small crust.
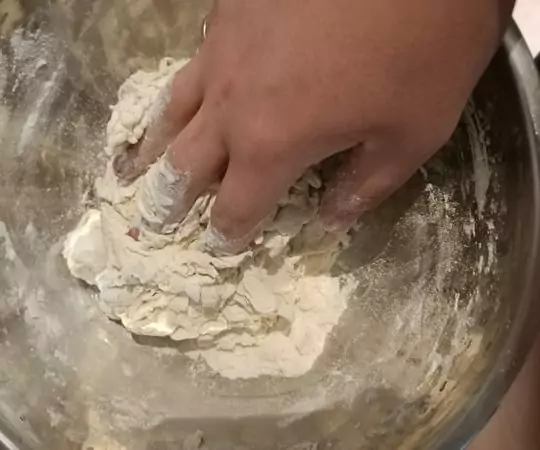
Pizza dough should be balled once it has proved. In general, pizza dough is proved in one big dough before being balled. This is known as the bulk ferment, or bulk prove.
Once the dough has proved, it is then shaped into dough balls. It is important that the dough balls are allowed to prove again after balling, before being shaped into pizzas.
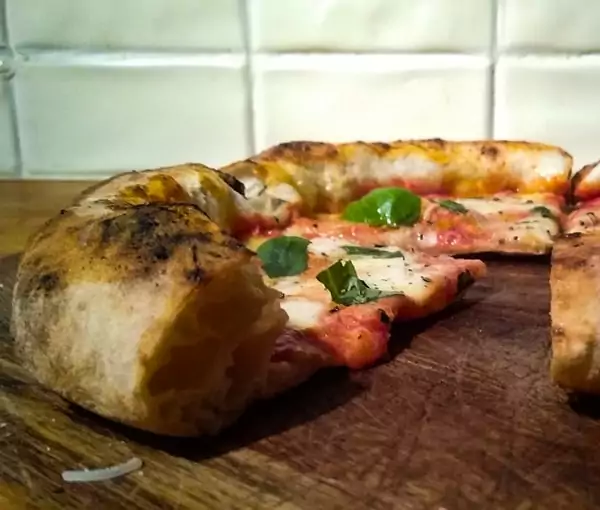
This is because a lot of the air in the dough (built up through the bulk prove) is lost during balling. Proving the dough balls again allows them to expand and become airy again. It is this air built up during proving which gives the crust a wonderful texture.
Also, as the dough balls relax as they prove. It is important that the pizza dough has time to relax after we have been handling them. So even if you are doing a short prove, it is important that you do not skip this step.
This will ensure that the dough is really soft and easy to stretch when we come to making the pizzas.
In general, pizza dough should not be kneaded after it rises. Kneading at this stage will remove all the air that has built up in the dough during proving.
If you think your pizza dough is weak then it can be kneaded again but this should really be done before proving.

If you need to, you can check out part 2 of this series on kneading by clicking here.
It is true that the pizza would prove again but we should limit the amount of times this happens. The more times we have to prove our dough, the more dense it becomes.
If you are doing a long prove, as I recommend, it is important to shape your dough balls after a bulk prove. If we shape our dough balls as soon as we have finished kneading they will lose all their strength at the end of the long prove (24 hours).

This is why I recommend proving your dough for around 18 hours (for a 24 hour prove) before shaping. We can then shape our dough balls and proof them for the remaining 6 hours.
This will ensure proper proofing of the dough balls without any loss of strength due to the long prove.
If you are only doing a short prove of up to 6 hours then you can go ahead and shape your dough balls immediately after kneading.
It is important to proof your dough balls at room temperature. This is because we need the dough to be as soft as possible when we come to stretch the pizza.

Even if you do a cold prove, be sure to remove your dough balls for their final proof. I actually recommend removing them a couple of hours before balling. This will make the shaping of the dough balls as easy as possible.
There are so many different types of container you can use for proofing pizza dough. Even if you don’t have a lid don’t worry, you can simply cover it with cling film (plastic wrap).
Here’s a list of containers that you can use:
Many people opt for a bowl. Everyone has one and it keeps the dough balls seperate. The downside is that the dough is difficult to remove from the bowl without degassing it. We want to retain as much of the air in the dough as we can.
A large dish is an excellent container for proofing pizza dough in. You can easily cover it with cling film. When it comes to removing the balls for shaping, we can easily get our hand in our use a dough scraper/wall scraper.

This ensures that we keep as much air in the dough as possible when it comes to shaping the pizza.
A chopping board is also a good option for proving. Removing the dough from a chopping board is very easy, The downside is that the cling film can stick to the top of the dough balls and takes a bit more time to set up. It is important to ensure that the balls are airtight so they don’t dry out.
Small tupperware containers are an excellent option. You can fit 2 dough balls in each one and you can use the lid to keep them air tight. Initially, they should be easy to remove with a dough scraper/wall scraper.
The final option is to buy a pizza proving box. They are quite inexpensive and they are great. I’ve had mine for a while and I’ve proved 12 dough balls at once in it! Removing the dough balls is really easy and the lid keeps them from drying out.
They are also a great space saver and make for easy transportation of dough when making large batches.

Whatever you decide to use just be sure you dough doesn’t dry out. I’ve made great pizza dough using all of the containers above so don’t worry too much about it!
Makes 4 x 250g pizza dough balls
With 00 flour:
Note: Caputo 00 pizza flour is an excellent option, especially for Neapolitan style pizza. It is one of the more widely available “professional” pizza flours. I have provided a link to it on Amazon below (a large chef’s bag). Aside from this flour, most 00 flours should work fine.
With Strong White Bread Flour:
Note: Any high protein white bread flour should be a decent substitute for 00 flour. Ideally you want a protein content of around 12% – 14% (sometimes shown as 12g – 14g per 100g). I’ve provided a link to a strong white flour on Amazon below (a large chef’s bag).
Not all the following utensils are required but these are what I use and they tend to make the process easier.
I’ve provided Amazon links for you to check the prices of these items if you don’t have them already. They are usually available for reasonable prices.
Large mixing bowl
Metal mixing bowls are lightweight, stackable, and easy to clean.
Digital weighing scales
These are affordable, easy to use, and very precise (accurate to 1g).
Accurate digital weighing scales
Scales accurate to 0.01g are perfect for weighing the tiny amounts of yeast required for long proves.
Pizza proofing box
Pizza proofing boxes are an excellent investment, especially if you intend on holding pizza parties at some point!
Stick Blender
With a stick blender, you can blend the tomatoes in a bowl and the clean up takes no time at all.
12″ pizza peel
A 12 inch peel is ideal for Neapolitan pizza and makes loading and removing your pizza from the oven easy.
And that’s it! Making pizza dough balls is really quite easy.
Click here to check out the next part where we prepare the pizza toppings.
As with most aspects of pizza making, there are many ways to shape and prove your dough balls.
The main things are to weigh your dough balls and to get them quite tight. Then be sure to allow them to prove fully before shaping into pizzas.
The final prove is key as it will ensure that dough balls rise properly and have time to rest following the balling.
Check out the next part where we prepare the toppings for the pizza in part 5.
If you missed the rest of the series or need to go back, you can check them out with the links below:
Good luck and let’s get balling!

I’m Tom Rothwell and I’m super passionate about all kinds of homemade pizza! In the last few years I've been on a quest to find the perfect pizza. Now I'm sharing what I've found out with the world!
If you're interested in hiring me for your event in the UK, feel free to check out my website with the link below.
Pizza Catering

I often get asked what type of oven I use for my pizzas. Well, I use a pizza oven made by a company called Ooni.
The range of pizza ovens that Ooni offers is just brilliant. They cover all bases, and all price points. There's affordable and portable models such as the Fyra 12 Pizza Oven and then there's state-of-the-art models such as the Karu 16 Pizza Oven pictured below.
In all honesty, I would say that the oven makes a huge difference. If you're looking to make authentic Italian pizza, a pizza oven is a must.
By clicking the link below and purchasing from Ooni, you would be supporting this website. I've been using their ovens for a long time now and I wouldn't recommend them if I didn't believe in their products.
Time to make some amazing pizza!
I’m Tom Rothwell and I’m super passionate about all kinds of homemade pizza! In the last few years I've been on a quest to find the perfect pizza. Now I'm sharing what I've found out with the world!
If you're interested in hiring me for your event in the UK, feel free to check out my website with the link below.
Pizza Catering


Just wanting to know how to store the pizza dough balls once formed if not ready to use straight away after the final proove.
Hi Megan, if you need to delay the proving of dough balls a little, you can always re-ball them. This can buy you another 2-6 hours.
If I have any dough balls left after making pizza then I combine them all together and remove the air from them. Then I store them in a covered bowl in the fridge.
Removing the air will mean that they don’t overprove in the fridge, and prevents them from losing strength. The dough can then be used the next day.
On the following day, I like to remove the dough and let in come to room temperature (couple of hours or so). Then I ball the pizzas like normal and let them prove for 4-6 hours before cooking.
You could experiment with refrigerating the dough balls as they were but you risk overproving and loss of strength.
Hope this helps!
Hi Tom! I made your dough recipe which tasted great but the dough was a bit sticky especially when it came to shaping it after the final 6 hour prove, could I have added a bit too much water?
Due to it being sticky I couldn’t pick it up off the work top with my peel or get it off the peel into the pizza oven.
My other issue was that when I was stretching and shaping the dough it kept springing back and not holding its shape well, have I over or under worked it?
Any help or advice would be appreciated thanks
Hi Chris, it sounds to me like you added a little too much water. I always recommend quite a dry dough, at least until you become very confident with dough making and pizza shaping.
Next time, if your dough feels a little sticky when mixing, try mixing in more flour bit by bit until the dour feels quite dry (and not sticky).
One thing that can throw you off is that the dough becomes softer and more sticky after resting. A dough that is slightly sticky may seem fine after mixing but after proving it will probably become very sticky and difficult to work with.
Also, a dry dough after mixing will become much softer after resting and will have the advantage of being easy to work with. A drier dough is also much easier to knead and will be naturally stronger than a wetter dough.
With regards to the springing back during stretching, it’s difficult to say for sure what the problem was. The dough could’ve been underkneaded, overkneaded, underproved, or overproved. My guess is that the dough was underkneaded since a wet dough is quite difficult to knead. Also, after the 6 hours your dough should be nicely proved.
When it comes to proving, just make sure that your dough has about doubled in size and has small bubbles in it. At this point the dough is good to go.
In summary, I would add a little more flour so that your dough is quite dry after mixing. I would then be sure to knead the dough well before proving (which should be much easier). Everything else I would just leave the same. Your shaping should become much easier.
Hope this helps and good luck!
I made your pizza following your wonderfully detailed instructions step by step. After years on and off of trying to make the perfect pizza dough, I finally did it thanks to you! You gave the best recipe I’ve ever found and tried. Thank you!
Hi Gordon, I’m so glad the pizzas turned out well for you! Keep going and it will soon become second nature. Making (and eating) amazing pizza is addictive!
Good luck!
Hello, I absolutely love your dough and have learned so much from your technique but I get a little confused on the timing. I would love for you to explain “making ahead” dough to refrigerate or freeze if possible. For example: I made the dough and with my timing the dough will be ready to ball up at 8:30 am tomorrow with 4-6 hours proof for balls to follow leaving it ready around 3:00 pm where I would rather it be ready to launch around 6:00 pm dinner time. Any suggestions?
Hi Carolyn, you could always adjust the amount of yeast to suit your timings. Using a little less yeast may help you as that would slow the prove down. Check out my pizza dough calculator here which may help.
Also, you can just delay the balling of your dough, as long as the dough isn’t overproving. But in general the best option would be to reduce the yeast slightly. A lot of pizza making comes down to trial and error and also watching the dough.
As the old saying goes: “watch the dough, not the clock”. If the dough is overproving it will need balling but if it isn’t then it can be left longer. If your dough balls are overproving you can simply reball them to delay the prove if needed.
I hope this helps, thanks for the question!
Hi,
If we are proving the pizza dough to be used for the same day itself, then what would be the proving time. Please help. Thank you…
Hi Nilofar, the minimum proving time that I recommend is 8 hours. Any less than this and the taste and texture of the dough won’t be as good as it could be. Quick dough is also very unforgiving since there is only a very small window of time when the dough is properly proved.
Feel free to check out my pizza dough calculator here. From there, you can select the size and number of pizzas you want to make, along with the prove time. The calculator will then give you the quantity of ingredients required.
Hope that helps. Good luck!
Didn’t work using 0.7g of yeast as you stated. Had to use 7g instead. Otherwise it was fine.
Hi Jacques, did you prove for the full 24 hours? And was your room temperature a bit cold? If so, this can slow the prove down. Also, I’m assuming you were using instant dried yeast?
If none of the points above were an issue then you must have a bad batch of yeast (it may contain dead cells). 7g is an awful lot of yeast to use and this amount would generally prove dough in around 2 hours.
Hope this helps.